


To enable Secure Boot, access BIOS settings, locate Secure Boot option, enable it, and save changes. Secure Boot enhances system security by preventing unauthorized software execution.
In today’s digital landscape, ensuring the security of our devices is paramount. One crucial way to protect your system from unauthorized software is by enabling Secure Boot. By following a few simple steps in the BIOS settings, you can activate Secure Boot and add an extra layer of security to your computer.
In this blog post, we will explore the importance of Secure Boot, its benefits, and a step-by-step guide on how to enable it effectively. Let’s dive in and secure your system against potential threats.
Introduction To Secure Boot
Secure Boot enhances system security by verifying the integrity of the operating system during startup. To enable Secure Boot, access the BIOS settings and locate the Secure Boot option to turn it on. This feature protects against unauthorized software and ensures a secure boot process.
Secure Boot is a security mechanism that ensures the system boots only with trusted software. It is a firmware feature that checks the signature of each piece of software that is loaded during the boot process. It was introduced to prevent malware from loading during the boot process. In this blog post, we will discuss the role of Secure Boot in system security and the advantages of enabling Secure Boot.
The Role Of Secure Boot In System Security
Secure Boot plays a crucial role in system security by preventing malware from loading during the boot process. It checks the signature of each piece of software that is loaded during the boot process and ensures that only trusted software is loaded. If the signature of the software is not recognized, Secure Boot will prevent it from loading, thus preventing malware from infecting the system.
Advantages Of Enabling Secure Boot
Enabling Secure Boot provides several advantages, such as:
- Prevents malware from loading during the boot process
- Enhances the security of the system
- Prevents unauthorized access to the system
- Protects the system from rootkits and other malicious software
In conclusion, Secure Boot is a critical security mechanism that ensures the system boots only with trusted software. Enabling Secure Boot provides several advantages, such as enhancing system security, preventing malware from loading during the boot process, and protecting the system from rootkits and other malicious software.
Prerequisites For Enabling Secure Boot
How to Enable Secure Boot? To enable Secure Boot, ensure your device supports it and access BIOS settings. Verify UEFI firmware and disable Legacy Boot. Enable Secure Boot option and save changes before restarting for enhanced system security.
Checking System Compatibility
Before enabling Secure Boot, it’s important to ensure that your system is compatible with it. Secure Boot requires a UEFI firmware interface and a 64-bit version of Windows 8 or later. To check your system’s compatibility, follow these steps:
- Open the Start menu and select “Settings”.
- Click on “Update & Security”.
- Select “Recovery” from the left-hand menu.
- Under “Advanced startup”, click “Restart now”.
- When the computer restarts, select “Troubleshoot”.
- Select “Advanced options” and then “UEFI Firmware Settings”.
- If you see the “Secure Boot” option in the firmware settings, then your system is compatible.
Updating Bios/uefi Firmware
To enable Secure Boot, you need to update your system’s BIOS/UEFI firmware to the latest version. This process may vary depending on your system manufacturer, but generally, you can follow these steps:
- Visit your system manufacturer’s website and locate the latest BIOS/UEFI firmware for your system.
- Download the firmware update and save it to a USB drive.
- Restart your computer and enter the BIOS/UEFI firmware settings by pressing the appropriate key (usually F2 or Del).
- Navigate to the “Update & Security” section and select “UEFI Firmware Update”.
- Select the firmware update file from your USB drive and follow the on-screen instructions to complete the update.
- Once the update is complete, enable Secure Boot in the firmware settings.
Enabling Secure Boot is an important step in securing your system against unauthorized access and malware attacks. By following these prerequisites, you can ensure that your system is compatible and up-to-date before enabling Secure Boot.
Preparing For Secure Boot Activation
Before enabling Secure Boot on your device, it is important to take a few preparatory steps. This will ensure a smooth and successful activation process without any data loss or compatibility issues. In this section, we will cover the essential tasks you need to complete before enabling Secure Boot.
Backing Up Important Data
One of the first steps you should take is to back up any important data on your device. Enabling Secure Boot may involve making changes to your system’s firmware, and while it is a relatively safe process, it’s always better to be prepared for any unforeseen circumstances.
To back up your data, you can follow these simple steps:
- Create a backup of your files and documents on an external storage device, such as an external hard drive or a cloud storage service.
- Make sure to include any important files, folders, and personal settings that you want to preserve.
- Verify the integrity of your backup by accessing a few files and confirming that they are intact.
By backing up your data, you can have peace of mind knowing that even if something goes wrong during the Secure Boot activation process, your important files will remain safe.
Understanding Boot Mode: Uefi Vs Legacy
Before enabling Secure Boot, it is crucial to understand the difference between UEFI and Legacy boot modes. Secure Boot is a feature available in UEFI (Unified Extensible Firmware Interface) firmware, which is the modern replacement for the older Legacy BIOS (Basic Input/Output System).
Here are some key points to keep in mind:
| UEFI | Legacy |
|---|---|
| Modern firmware | Older firmware |
| Offers advanced security features like Secure Boot | Does not support Secure Boot |
| Supports larger hard drives and partitions | May have limitations on drive size and partitioning |
| Provides faster boot times | May have slower boot times |
To enable Secure Boot, your system must be running in UEFI mode. If your device is currently set to Legacy boot mode, you will need to switch to UEFI mode before proceeding with Secure Boot activation.
Switching to UEFI mode typically involves accessing your system’s BIOS settings and locating the Boot mode or Boot options section. From there, you can select UEFI as the preferred boot mode and save the changes.
Once you have successfully switched to UEFI mode, you will be ready to enable Secure Boot and enhance the security of your device.
Credit: softkeys.uk
Accessing The Bios/uefi Settings
Accessing the BIOS/UEFI settings is an essential step in enabling Secure Boot on your computer. These settings allow you to configure various hardware and software options, including the Secure Boot feature. To access the BIOS/UEFI settings, you need to follow a few simple steps:
Navigating To The Boot Menu
The first step is to restart your computer. As the computer restarts, you need to press a specific key to enter the BIOS/UEFI settings. The key to access these settings may vary depending on the manufacturer of your computer. Generally, you can try pressing the F2, F10, or Del key repeatedly until you see the BIOS/UEFI screen.
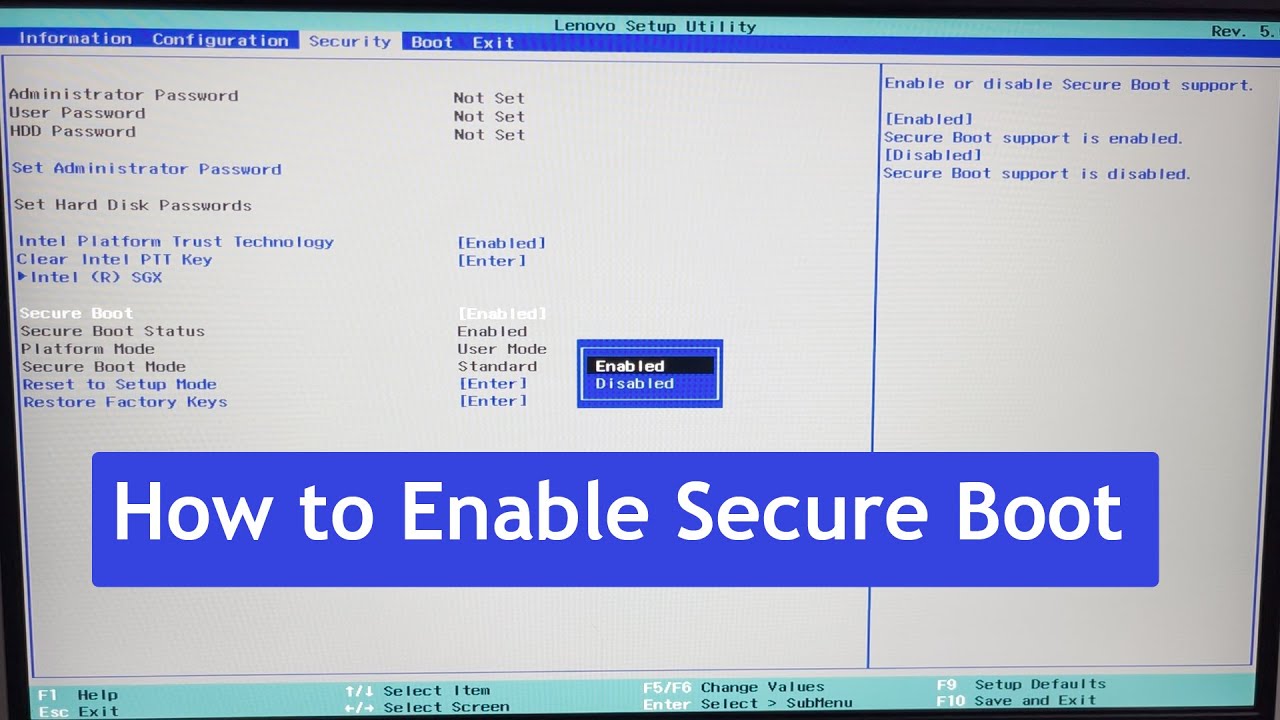
Identifying The Secure Boot Option
Once you are in the BIOS/UEFI settings, you need to navigate to the Boot menu. This menu contains various options related to booting your computer. Look for the option that mentions “Secure Boot” or “UEFI Boot” in its name. The exact wording may vary depending on your computer’s manufacturer.
If you are unable to find the Secure Boot option, refer to your computer’s manual or the manufacturer’s website for specific instructions. Some older computers might not have the Secure Boot feature, so it’s important to check compatibility before proceeding.
Once you have located the Secure Boot option, you may need to enable it. Use the arrow keys on your keyboard to select the option and press Enter. The BIOS/UEFI settings might require you to choose between “Enabled” and “Disabled” for Secure Boot. Select “Enabled” to enable the Secure Boot feature.
After enabling Secure Boot, make sure to save your changes before exiting the BIOS/UEFI settings. Look for the option to save and exit, usually labeled as “Save and Exit” or “Exit and Save Changes”. Press the corresponding key or use the on-screen instructions to save your changes and restart the computer.
By following these steps, you can easily access the BIOS/UEFI settings and enable the Secure Boot feature on your computer. This added layer of security helps protect your system from unauthorized software and ensures a safer computing experience.
Enabling Secure Boot
Enabling Secure Boot on your computer is a crucial step in ensuring the security and integrity of your system. By activating this feature, you can prevent unauthorized firmware, operating systems, and option ROMs from running during the boot process, thereby enhancing the overall security posture of your device.
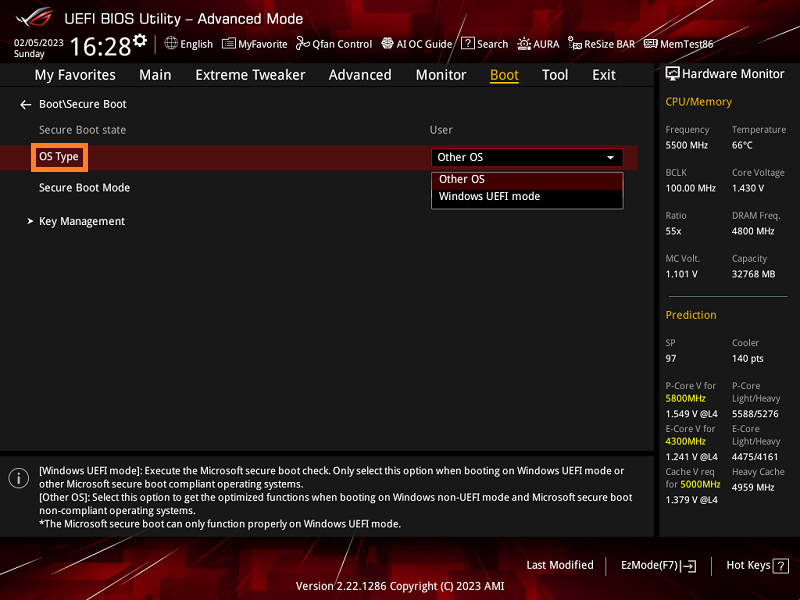
Configuring Key Management
Before enabling Secure Boot, it’s essential to configure the key management settings. This involves managing the digital signatures and certificates used to verify the authenticity of firmware, drivers, and operating systems during the boot process.
Activating The Secure Boot Feature
Once the key management is properly configured, you can proceed with activating the Secure Boot feature. This involves accessing the system’s firmware settings and enabling the Secure Boot option. After activation, the system will only execute firmware, drivers, and OS loaders that have been digitally signed with trusted keys, thereby enhancing the overall security of the boot process.
Credit: www.asus.com
Post-activation Steps
After enabling Secure Boot on your system, there are a few important post-activation steps that you should follow to ensure its proper functionality. Verifying the Secure Boot status and troubleshooting any common issues that may arise are crucial in maintaining a secure computing environment.
Verifying Secure Boot Status
To verify the status of Secure Boot on your system, follow these simple steps:
- Access the BIOS or UEFI settings on your computer.
- Locate the Secure Boot option.
- Ensure that the Secure Boot status is enabled.
- Save the changes and exit the BIOS or UEFI settings.
Troubleshooting Common Issues
If you encounter any issues after enabling Secure Boot, consider the following troubleshooting steps:
- Check for firmware updates for your system.
- Verify the compatibility of your hardware and software with Secure Boot.
- Ensure that all drivers are digitally signed to work with Secure Boot.
- If you are still experiencing issues, consult the manufacturer’s documentation or support resources for further assistance.
Operating System Considerations
To enable Secure Boot, consider accessing the BIOS or UEFI settings on your operating system. Look for the Secure Boot option and enable it to enhance system security. This step helps prevent unauthorized operating systems or malware from loading during the boot process.
Compatibility With Windows
When setting up Secure Boot, ensure Windows compatibility by using a Microsoft-signed certificate.
Managing Secure Boot With Linux Distros
Linux distros may require disabling Secure Boot or installing custom keys for proper functionality.
When enabling Secure Boot, consider the operating system being used.
Ensure Windows compatibility by using a Microsoft-signed certificate.
Linux distros may require disabling Secure Boot or installing custom keys.
Maintaining System Security
To enhance system security, it’s crucial to enable Secure Boot. This feature helps prevent unauthorized operating systems or malware from loading during the boot process, thus safeguarding the system against potential threats. By enabling Secure Boot, you can strengthen the overall security posture of your system.
Regularly Updating System Firmware
Updating firmware ensures protection against vulnerabilities. Regular updates enhance security measures.
Best Practices For Continued Protection
Implementing strong passwords and enabling two-factor authentication improves security. Regularly scan for malware and perform system backups. By updating firmware, you protect against vulnerabilities. Strong passwords and backups enhance security.
Frequently Asked Questions
What Is Secure Boot And Why Is It Important?
Secure Boot is a security feature that helps prevent unauthorized operating systems from loading during the system start-up process. It ensures that only digitally signed operating systems are loaded, protecting against malware and unauthorized changes to the system.
How Do I Check If Secure Boot Is Enabled On My Computer?
To check if Secure Boot is enabled, restart your computer and enter the BIOS setup. Look for the Secure Boot option in the BIOS settings. If it’s enabled, the status should be indicated as “Enabled”. Consult your computer’s manual for specific instructions on accessing the BIOS setup.
Can I Enable Secure Boot On An Older Computer?
Whether you can enable Secure Boot on an older computer depends on the system’s compatibility. Secure Boot requires UEFI firmware, so if your older computer uses legacy BIOS, it may not support Secure Boot. Check with your computer’s manufacturer for information on compatibility and potential firmware updates.
How Do I Enable Secure Boot On My Windows Computer?
To enable Secure Boot on a Windows computer, restart it and enter the BIOS setup. Locate the Secure Boot option in the settings and enable it. Save the changes and exit the BIOS. Keep in mind that enabling Secure Boot may require additional steps, such as managing secure boot keys.
Conclusion
To conclude, enabling Secure Boot is a crucial step in safeguarding your computer against unauthorized access and malicious software. By following the simple steps outlined in this blog post, you can ensure that only trusted operating systems and firmware are loaded during startup.
This additional layer of security provides peace of mind and protects your valuable data from potential threats. Take the necessary precautions today and enjoy a more secure computing experience.