

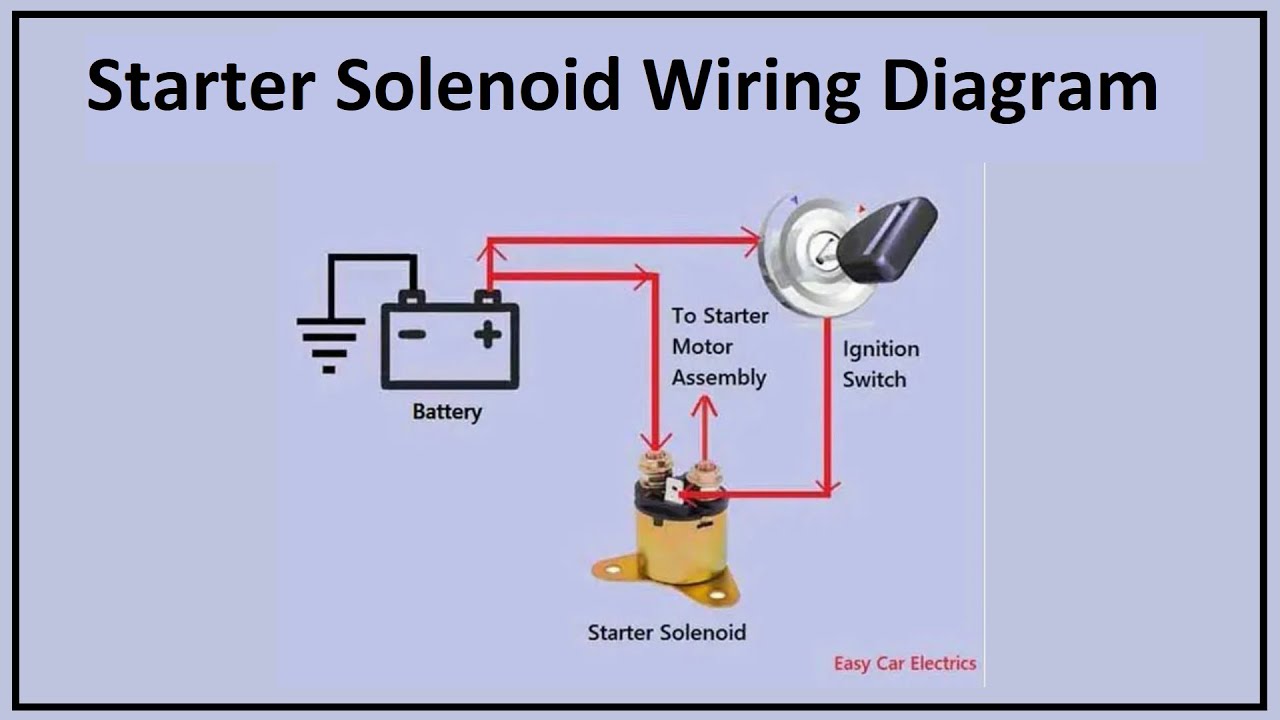
To wire a starter solenoid, connect the positive battery terminal to the big lug on the solenoid. The ignition switch signals the relay/solenoid to engage the starter circuit for starting the engine efficiently.
When installing the wires to the starter solenoid, it’s crucial to ensure the correct connection of the positive wire from the battery to the designated terminal on the solenoid. Proper wiring is essential for the starter system to function optimally and avoid any potential issues during the starting process.
Following the correct wiring diagram and connecting the wires accurately will help maintain the longevity and efficiency of the starter solenoid in your vehicle.

Credit: www.pinterest.com
Introduction To Starter Solenoids
A starter solenoid is a crucial component in a vehicle’s starting system. It plays a key role in initiating the engine’s ignition process by enabling the starter motor to crank the engine. Understanding the basics of starter solenoids and their components is essential for vehicle maintenance and troubleshooting.
Purpose of a Starter SolenoidA starter solenoid serves as a relay switch that controls the high current required to start the engine. It acts as a bridge between the battery and the starter motor, ensuring the smooth engagement of the motor to crank the engine efficiently.
Components of the Solenoid Assembly- Electromagnetic Coil: Creates a magnetic field when energized.
- Plunger: Moves to connect the high-current contacts when the solenoid is activated.
- Contacts: Conducts high current from the battery to the starter motor.
- Housing: Encases the components and provides protection.
Credit: m.youtube.com
Safety First
When working on a starter solenoid, it’s important to prioritize safety first. To diagram the wires correctly, it’s best to consult a reliable source such as a wiring diagram manual or seek advice from a professional.
Disconnecting The Battery
Before working on the starter solenoid, always start by disconnecting the battery to prevent electrical accidents.
Protective Gear And Precautions
Wear protective gloves and safety goggles to shield yourself from any potential electrical sparks or battery acid. Ensure the work area is well-ventilated to avoid inhaling any fumes.
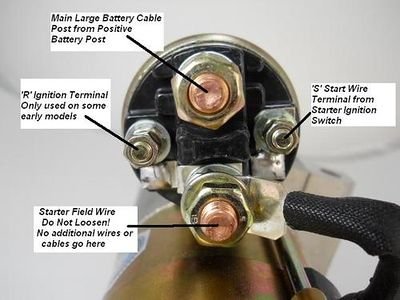
Identifying Solenoid Terminals
The ‘s’ Terminal
The ‘S’ terminal on the starter solenoid is typically connected to the ignition switch. When the ignition key is turned to the start position, 12 volts are sent to the ‘S’ terminal, activating the solenoid and allowing current to flow from the battery to the starter motor.
The ‘r’ Terminal
The ‘R’ terminal, if present, is used for a resistor bypass. In some older vehicles, it bypasses the ignition resistor during cranking to provide a hotter spark while starting. However, many modern vehicles do not use the ‘R’ terminal.
Main Battery Terminal
The main battery terminal on the starter solenoid is where the positive cable from the battery is connected. This terminal is responsible for carrying the high current required to engage the starter motor.
Wiring The Solenoid
When it comes to wiring the starter solenoid, it’s important to ensure that each wire is connected correctly to ensure proper functioning. This process involves connecting the positive battery cable, attaching the ignition wire, and wiring the starter motor.
Connecting The Positive Battery Cable
The positive cable from the battery should be securely connected to the large terminal on the solenoid. This cable is responsible for supplying power from the battery to the starter motor when the ignition key is turned.
Attaching The Ignition Wire
The ignition wire, often a smaller gauge wire, needs to be attached to the ignition terminal on the solenoid. This wire carries the electrical signal from the ignition switch to activate the solenoid and engage the starter motor.
Wiring The Starter Motor
The starter motor is wired by connecting the remaining terminal on the solenoid to the starter motor. This connection allows the solenoid to transmit power from the battery to the starter motor, initiating the engine’s cranking process.
Understanding Polarity
When wiring a starter solenoid, understanding polarity is crucial. Polarity refers to the positive and negative terminals of the electrical system. It’s essential to connect the wires correctly to ensure the starter solenoid functions properly.
Does Polarity Matter?
Yes, polarity matters significantly when connecting wires to the starter solenoid. Connecting the wires with incorrect polarity can result in the solenoid not engaging, which can lead to starting issues.
Correctly Connecting The Wires
When connecting the wires to the starter solenoid, it’s essential to ensure that the positive (+) wire from the battery is connected to the appropriate terminal on the solenoid. Additionally, the other wires should be connected according to the manufacturer’s specifications to maintain the correct polarity.
Credit: www.corvetteforum.com
Troubleshooting Common Issues
When dealing with starter solenoid issues, it’s important to understand common problems and how to troubleshoot them effectively. This will help you diagnose and fix any wiring issues with the starter solenoid, ensuring your vehicle starts reliably every time.
Signs Of A Bad Solenoid
If you suspect a faulty starter solenoid, there are certain signs to watch out for, indicating potential issues. These include:
- Clicking Sound: When you turn the key and hear a clicking sound but the engine doesn’t start, it could indicate a bad solenoid.
- No Cranking: If the engine doesn’t crank when you turn the key, it may be due to a malfunctioning solenoid.
- Intermittent Starting: Inconsistent starting, where the vehicle starts sometimes but not others, could be a sign of solenoid trouble.
- Smoke or Burning Smell: Any signs of smoke or a burning smell near the solenoid could indicate electrical issues.
Testing The Solenoid Function
Testing the function of the starter solenoid can help determine if it’s working properly. Here’s how to test the solenoid:
- Check the Wiring: Ensure all wires are securely connected to the solenoid and there are no signs of damage or corrosion.
- Use a Multimeter: Test the continuity of the solenoid’s terminals using a multimeter to check for proper electrical flow.
- Inspect for Wear: Look for any physical wear or damage on the solenoid that could indicate internal issues.
- Bench Test: If necessary, you can perform a bench test on the solenoid to see how it functions outside the vehicle.
Visual Aids And Diagrams
When it comes to understanding complex wiring systems, visual aids and diagrams play a crucial role in simplifying the process. Whether you’re a seasoned mechanic or a DIY enthusiast, decoding wiring diagrams is essential for any electrical work on your vehicle. Let’s explore how you can effectively utilize visual aids and diagrams to comprehend the wiring connections for the starter solenoid.
Reading Wiring Diagrams
Understanding how to read wiring diagrams is fundamental in deciphering the intricate web of electrical connections. A wiring diagram is a visual representation of the electrical system, displaying the interconnections between various components. It uses symbols and color-coding to illustrate the paths of the wires and their respective functions.
By familiarizing yourself with the symbols and conventions used in wiring diagrams, you can easily trace the wires leading to the starter solenoid and comprehend their roles within the system. This skill is invaluable for troubleshooting, modifications, or installations involving the starter solenoid.
Using Online Resources
With the advent of online resources, accessing wiring diagrams has never been easier. Numerous websites and forums offer comprehensive wiring diagrams and visual aids for a wide range of vehicles. These resources provide detailed insights into the wiring configurations for starter solenoids in various makes and models.
Additionally, instructional videos on platforms like YouTube offer step-by-step guidance on deciphering starter solenoid wiring diagrams. These visual demonstrations can enhance your understanding and enable you to tackle wiring tasks with confidence.
Final Steps
After diagramming and connecting the wires to the starter solenoid, the final steps involve double-checking connections and testing the starter system.
Double-checking Connections
- Ensure all wires are securely connected to the correct terminals on the starter solenoid.
- Verify that there are no loose connections that could cause electrical issues.
- Double-check the wiring diagram to confirm proper placement of each wire.
Testing The Starter System
- Use a multimeter to test the continuity of the wires connected to the solenoid.
- Check for any voltage drops or irregularities that may indicate a faulty connection.
- Engage the ignition to test the starter solenoid’s functionality and ensure proper engagement with the starter motor.
Frequently Asked Questions
What Wires Go Where On A Starter Solenoid?
The positive wire from the battery goes to the big lug on the solenoid. The ignition switch signals the solenoid to engage the starter circuit. Polarity doesn’t matter for solenoid valve coils.
Does The Positive Wire Go To The Solenoid?
Yes, the positive wire should go to the solenoid’s big lug connected to the battery terminal for proper functionality.
What Sends Power To The Starter Solenoid?
The ignition switch signals the starter relay/solenoid to send power to the starter for engagement.
Does It Matter Which Way A Solenoid Is Wired?
The wiring direction of a solenoid does not matter; polarity is interchangeable for valve coils. Both lead wires are typically the same color, allowing you to connect either to the positive terminal.
Conclusion
Understanding the wiring of a starter solenoid is crucial for a smooth engine start. By following proper diagrams, you can ensure the correct connection of wires. Remember, the positive battery terminal links to the big lug on the solenoid. This knowledge will help maintain your vehicle’s functionality.